Interested in Onsite Systems?
Get Onsite Systems articles, news and videos right in your inbox! Sign up now.
Onsite Systems + Get AlertsAs part of a presentation I gave during the Pumper & Cleaner Environmental Expo International in February, I discussed different kinds of inspections we in the industry become involved with. I pointed out each of those inspections has a specific purpose, and while there are similarities in the way they are conducted, there are also major differences; due to the different purposes.
I lumped the inspections into three general categories: new system inspections, existing system inspections for real estate transactions, and existing system inspections conducted for system management (operation and maintenance). As expected for such a broad topic, the presentation has triggered a number of questions. I will cover the questions in this and future articles.
YOUR FIRST QUESTION
The first question that arose was, “You had a list on one of the slides of what a proper inspection for a real estate transfer involved. What are the proper steps?” Here are the items listed on that slide, and as I mentioned at the time, there were a number of other items to be considered: locate tanks; uncover lids; observe water level; pump; check tank integrity; locate and uncover parts of drainfield; observe, determine type and amount of treatment area; 6 to 8 hours; permission required from owner to “dig up’’ property; release of liability.
As a general list, this is probably not too bad, but it leaves a lot of gaps to fill in if someone is not familiar with the inspection process. So here are some additions to the list and a little discussion about some aspects of the list. I welcome comments, questions, additions and subtractions to what is provided.
The list assumes the inspector (I use this term only to indicate that the person is inspecting the system, they could be a pumper, site evaluator, installer, service provider, etc.) is already on the site and beginning the field investigation phase of the inspection.
As the inspector of an existing system – particularly for real estate transactions – I want to find out as much about that system as possible before beginning to identify and open any part of the system. That means when the call comes for an inspection, I collect all of the information I can about the system and the location.
For safety, I make sure the utilities will be located because there will be some digging and probing. I look at soil survey data for the area. I contact the local county or permitting authority for records they may have and, if possible, go through a series of homeowner questions about use and care of the system. Sample forms and questionnaires are available from a number of sources.
In initial discussions with the client, I would ask if all parts of the system have been located and are accessible or if I am to do the locating and the digging. If the latter is the case, I present a locating fee schedule along with the actual inspection fee.
MAPPING IT
Once all components have been identified and located, enter them on a scale map or drawing of the site. This information will be valuable in the future when the property changes hands again and another inspection is required.
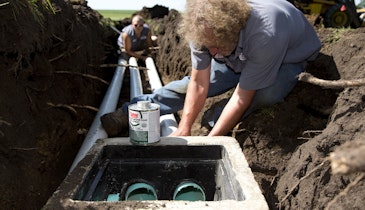
I would recommend walking over the entire area looking for evidence of problems. After all of this groundwork, it’s time to open the system’s tank or tanks and observe the contents, including liquid levels, scum and sludge depth, evidence of backups, etc. When the lid of the manhole is removed, the inspector should check its integrity, which can tell a lot about any safety concerns and the tank’s water tightness.
Now the tank should be pumped and its integrity evaluated, along with condition of the baffles. Check for cracks, roots and any evidence the tank has operated above the normal operating level. This evidence might include a black line higher in the tank or toilet paper hanging from the top of the tank.
One note here: If it’s obvious at this time that the system will not pass inspection, consult the customer about proceeding with the pump-out. If the tank will need replacement, it will need to be pumped at that time, and the customer may not want to pay for pumping twice.
After the tank or tanks, the soil treatment area should be evaluated. If there are inspection ports, they should be opened to determine liquid levels in the trenches. If there are distribution or drop boxes, open and evaluate them for integrity and indications of system backups or other problems. Determine the size and location of the soil treatment area. Look for evidence that effluent is or has recently surfaced. Note odors, wet spots and areas with changes in vegetation.
In some locations the inspector is asked to determine whether the size of the treatment area is adequate for the building. This requires estimating the daily sewage flow and knowing the soil type and the soil sizing factor. A soil boring should be conducted to confirm the soil texture and any other soil characteristics in local or state inspection requirements.
IT TAKES TIME
The six- to eight-hour time estimate refers to time spent on the inspection if all the steps and procedures are followed. This is usually a surprise to homeowners and real estate agents who expect the inspection will take a few minutes. The cost of the inspection is related to the time and the activities involved, and a comment I often hear is that when an inspector does a thorough job, they are priced out of the market. As an industry, we need to set the standard and educate homeowners, real estate agents and building inspectors about what it takes to do a good inspection and show the value of knowing how well a system is operating.
The last item on my list is something that should be discussed with the homeowner up front – that there will be some disturbance to the yard and some digging. However, the inspector should put everything back in place. This may require taking up the sod and storing the soil on a plastic tarp and replacing after the inspection. If there are any major safety issues connected with the system, the inspector should report those to the homeowner. It is important that the inspector conveys professionalism and remembers that cleanup is as important as the first meeting and discussion.